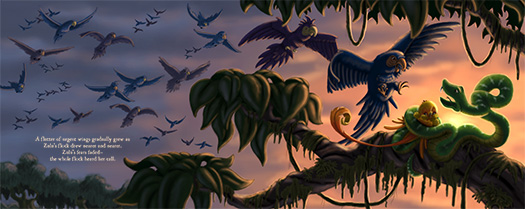
Finally, I have taken the time to document my process, or at least most of it, and now I want to share it with you. I am currently painting 3 illustrations for my Zulu book to complete my dummy, so I will take 2 of those 3 to show you how I get to the final product.
This illustration started out pretty tame but I knew I wanted to show all of Zulu's flock coming to her rescue. An illustrator friend reminded me that this part of the story is the climax of the story and should really grab the viewer. So in my mind Zulu's flock wasn't just coming to her rescue, they were "War Parrots" on a mission to recover a P.O.W.!! So I took this image as my inspiration for the illustration and pushed the drama as much as I could -- without making the birds look too evil and menacing.
So below are 3 of the sketches, rough to final value sketch. The main idea remained constant throughout so only small things were changed as I cleaned it up.
Then I digitally added color to my sketch.
After color and values are worked out and I'm happy with the image I print it in full color. This makes the final acrylic painting process go much faster. I don't have to spend time transferring the line work and I already have a color base so I don't have to do underpainting! The image is pretty much all there, I just have to go over it to clean it up and add details.
I print straight onto Bristol Vellum paper (300 series so it's nice and thick!) I get the large pad of paper (19x24) so I can print full spreads on one sheet. I cut the Bristol a little larger than the image (this illustration is 20x8).
**NOTE: before you print, make sure you extend every side of the image somewhere between .5"-1"to allow for a bleed. If not you will be sorry later!!** Then I print full size, or a bit larger than full size. I use an Epson R1800 printer, which is a beast of a machine, old, and eats up a lot of ink, but it allows me to print up to 13" wide and it makes beautiful prints, so I love it. Unfortunately it's difficult to get the printed image to look as nice and bright and colorful as the digital image (because I'm not using the best paper for it) but that's why I paint right over it! Actually, the final painting usually ends up even more bright and colorful than the digital color sketch.
Once the image is ready I cut a piece of illustration board (Coldpress, so it has some texture to it) to the size of the printed image. I mount the Bristol paper on the illustration board so the painting is firm and stiff since the paper tends wrinkle, rip, or somehow get messed up when I prep it and paint it.
I use Liquitex Matte Medium to mount the Bristol onto the illustration board. It pretty much works like glue, so I squirt some onto the illustration board, spread it around with a brush and apply the Bristol paper onto and make sure it is nice and flat and secure. To make sure the paper sticks really well (you can get bubbles if you have flimsy paper or edges that don't stay down if it doesn't dry flat) I usually put a stack of heavy books or boxes on top of the image and let it sit for about 15 mins or longer to let it dry.

Once the Bristol paper is dry and secure to the illustration board I use Matte Medium again to make a few layers on top of the image. Don't worry, it DOES dry clear, so it wont mess with your colors....maybe slightly but not to a point that it ruins anything. By doing this I am not painting directly onto the paper or the ink, but on a thin layer of Matte Medium. I like how the acrylic paint takes to this layer better than the paper, and if you use a mini sponge roller (I get them from Michael's, love them!!!) you get an even texture to the image instead of using a paintbrush, which usually makes streaks. I usually do a layer of Matte medium, let it dry for 20-30 mins. and do a second layer to make sure it's covered all the way. Let it dry completely. Then I stick the dry, mounted image under a huge stack of books and let it sit over night to make absolutely sure it's all stuck together and flat for when I paint.


Those are the basic steps to my process. If you have any questions about any of the steps or materials that I use, please let me know, I would love to share, and I am always interested in learning ways to improve my process so suggestions are welcome!
I'm going to do my best to document my painting progress as I go along and I will post it with the final painting as soon as it is done! In the mean time, keep creating!!


